Instructors Companion
The major goal of the unit on The Light, Sight, and Rainbows is to enable students to appreciate the characteristics of light and the human eye that allow us the behold natural phenomena including Sunsets, blue skies, and rainbows. Our focus is not on learning all about light, or the detailed physiology of the eye. Instead we encourage students to discover just the basic phenomena needed to acquire a deeper appreciation of human vision. The story of how seeing occurs and the role light plays in vision is not straightforward for many students. Students often bring ideas about light and vision to their study that get in the way of scientific understanding. For example, educational research has uncovered a number of notions including the idea that: (1) it is possible to see without light once your eyes adapt to the dark; (2) light itself can be viewed from the side without impinging on the eye; and (3) even if light must shine on an object in order for someone to see the object, light doesn't have to impinge on the eye.
As is the case is all our Explorations in Physics units, we endeavor to accomplish our learning goals in four steps. First, we lead students to an exploration of the characteristics of light in the classical realm - how it travels, interacts with objects, and enables us to see. Second, we help students build an idealized working model of the human eye that helps them understand how the eye could use refract light and hence organize information about the visual world for the brain to interpret. Third, we look at the intrinsic properties of light that allow us to see color including observations of the spectral fingerprints of different gases. Finally, we ask students to use what they have learned about light and vision along with additional observation to explain why Sunsets are red, the sky is blue, and why rainbows form.
If possible we recommend that you give students homework after every class that helps them consolidate what they have learned. We recommend carving out between 12-18 hours of topic related small group projects. These projects often give students a sense of mastery over some aspect of the topics they have worked with in the guided inquiry mode.
![]() Time Estimate: Allow 15-18 hours of class time to complete the guided inquiry activities in the four sections of this unit.
Time Estimate: Allow 15-18 hours of class time to complete the guided inquiry activities in the four sections of this unit.
- 1. How is information transmitted to our eyes?
- 1.1 A First Look At Motion
- 1.2 How Does Light Travel?
- 1.3 Light and Objects: Reflection and Scattering
- 2. From Light to Sight
- 2.1 Modeling the Eye
- 2.2 Changing the Direction of Light
- 2.3 A Lens in Action
- 3. Color: How Can We See It?
- 3.1 Color and Light
- 3.2 Transmission Graphs and the Spectrum of Light
- 3.3 Real Objects
- 4. The Real World: Rainbows, Blue Skies, and Sunsets
- 4.1 Rainbows
- 4.2 The Sun and the Sky
- 5. Project Ideas
1. How is information transmitted to our eyes?
Once students complete Activity 1.1.1 (about whether it is possible to see in the dark) you can discuss the purpose of the activities in this section with the students. The overarching purpose of this section is to learn enough about light to understand its role in vision.
![]() Time Estimate: Allow about 255 minutes for students to complete the activities in Section 1.
Time Estimate: Allow about 255 minutes for students to complete the activities in Section 1.
1.1 Light, Dark and Sight
The unit begins with the question in Activity 1.1.1 "Can you see without light?" It is important to set the tone for the entire unit by encouraging an open and hopefully vigorous discussion of whether on not this is true. It is often helpful to play devil's advocate to encourage debate. For instance, if students claim that light is needed, you might ask the class if anyone has found that they can see better and better after their eyes have had a chance to adapt. Typically there will be advocates on both sides of the question. Once students observe that the presence of light is absolutely necessary to see, you should mention that the major purpose of Section 1 is to learn more about the properties of light in order to understand its role in seeing.
In Activity 1.1.2 students make a very simple observation -- looking at light from the side to determine if they can see it. Here is another chance to stimulate a debate beforehand. Students are also asked to determine if they can see light as it passes through clear water. Then in Activity 1.1.3 students are asked to predict what will happen to their ability to see light from the side if powdered creamer is sprinkled into the water. They should observe that even through light can pass through clear water without being seen, it will scatter off the cream particles. These observations are a precursor to further investigations into the circumstances under which light travels in straight line or scatters.
The first of several unit checkpoints occurs at the end of Section 1.1. We recommend that you get in the habit of using checkpoints fairly religiously. One of the pitfalls of the activity-based approach to teaching, is that it is easy for students to draw fallacious conclusions and then barrel ahead on an unproductive path. Requiring students to summarize what they have observed and concluded is a powerful way to help them consolidate what they have learned and keep on the right track.
![]() Technical Tip: It is a lot of fun and quite dramatic to plunge the students in the dark as the first all-class observation for this unit (Activity 1.1.1 ). But, you need to find a room that can be easily darkened or put in extra effort to darken a room enough so students will see nothing for several minutes. This may involve stuffing rags under doors and using tape to seal cracks around window shades. If the room is properly darkened then the students will not be able to see an object in the center. Instead as their eyes adapt they will begin to see light through cracks in doorways and windows.
Technical Tip: It is a lot of fun and quite dramatic to plunge the students in the dark as the first all-class observation for this unit (Activity 1.1.1 ). But, you need to find a room that can be easily darkened or put in extra effort to darken a room enough so students will see nothing for several minutes. This may involve stuffing rags under doors and using tape to seal cracks around window shades. If the room is properly darkened then the students will not be able to see an object in the center. Instead as their eyes adapt they will begin to see light through cracks in doorways and windows.
In Activities 1.1.2 and 1.1.3 it is important to use a clear container with straight sides to hold the water as a curved one will lead to reflections at boundaries between surfaces. We found rectangular pencil holders at an office supply store. Students need to add the right amount of creamer to the water. Too little and there is not enough scattering. Too much and the mixture of water and creamer becomes opaque. If too much gets added, just have students dump out their mixture and start again.
1.2 How Does Light Travel?
The point of this subsection is to allow students to observe that under ordinary circumstances, light will travel in straight lines in transparent materials unless impeded by objects. Students use a small Maglite with the reflector removed as a point source.
In Activity 1.2.1 students place a point source of light at the center of a blackened ping pong ball and observe light emerging from a ping pong ball with tiny holes drilled in it. They can only see light when looking though a hole along a line that points straight toward the center of the ball. Next in Activity 1.2.2 students look at shadows cast by both point sources and extended sources. They finish this activity by considering the relationship between the pingpong ball activity and the activity they just finished on shadows and extended sources.
![]() Technical Tip: The black ping pong ball with holes (shown in Fig. B-2 on pg. 9) is our invention and so you will need to make some for your students. Start by drilling a hole in the ball that is just barely big enough to fit the shaft of a Maglite™ in it. Next you should drill several very small holes ( 1-2 mm in diameter) at random locations around the ball. Then use a can of fast drying flat black spray paint to cover the inside and outside of the ball with a black coating. If you leave white edges or white surfaces inside the ball, the light will scatter and reflect from these white areas and ruin the "light travels in straight lines" effect we are looking for. The rest of the apparatus is straightforward and easy to assemble.
Technical Tip: The black ping pong ball with holes (shown in Fig. B-2 on pg. 9) is our invention and so you will need to make some for your students. Start by drilling a hole in the ball that is just barely big enough to fit the shaft of a Maglite™ in it. Next you should drill several very small holes ( 1-2 mm in diameter) at random locations around the ball. Then use a can of fast drying flat black spray paint to cover the inside and outside of the ball with a black coating. If you leave white edges or white surfaces inside the ball, the light will scatter and reflect from these white areas and ruin the "light travels in straight lines" effect we are looking for. The rest of the apparatus is straightforward and easy to assemble.
1.3 Light and Objects: Reflection and Scattering
In this subsection students explore what happens to light when it impinges on different types of surfaces - in particular reflection from mirrors and scattering from rough surfaces. In Activity 1.3.1 the concept of normal to a surface is defined and students are asked to predict how a "ray" of light will reflect from a mirror in terms of the angle the reflected ray makes with respect to the normal. After some practice with drawing normal lines at various points along an uneven surface, students test their predictions using a ray box and mirror. This activity ends with a Checkpoint as students will need a sound understanding of the concept of normal law of reflection is later activities. In Activities 1.3.3 through 1.3.4 students use an electronic light sensor to observe the difference in how light travels when it is reflected from a mirror and scattered from a white piece of paper. In Activity 1.3.5 students explore the nature of a physicist's black body consisting of a hole cut in an otherwise light tight box. These observations are important as they help students understand the role that the pupil of the eye plays, and why, in the absence of a bright light shining directly into it, the pupil always appears black no matter what color the iris is. After doing several related scattering observations (Activities 1.3.3 and 1.3.4) and the black body observations (Activity 1.3.5) students should be convinced that in order to see an object, light must be coming to the eye.
![]() Technical Tip: In order to do many of the activities in this subsection students will need a good ray box consisting of a bright white light source that is forced into a narrow beam or "ray." Sensing light electronically is advantageous because the sensor is better than the eye at recoding small differences in light intensity (brightness). Electronic detection requires the use of a microcomputer based laboratory system that includes a sensor an interface and software. We support the use of systems provided by Vernier Software & Hardware or PASCO scientific. You may want to use a pre-configured experiment file for use with the Vernier LabPro software or the PASCO DataStudio software. Since the electronic sensor is first used in Activity 1.3.2, these configuration f iles are available for downloading from the EiP instructor website under the names L010302.mbl (for the Vernier LabPro Software) or L010302.ds (for the PASCO DataStudio Software). The "black body" used in Activity 1.3.4 can be any fairly small cardboard box with a lid on it so light cannot get in or out of it except through a small hole cut in it. A Stationary box just big enough to hold a mini-Maglite (as shown on page B-23) work well. If the inside of the box is actually white when its lid is removed, the fact that the hole always looks black surprises students.
Technical Tip: In order to do many of the activities in this subsection students will need a good ray box consisting of a bright white light source that is forced into a narrow beam or "ray." Sensing light electronically is advantageous because the sensor is better than the eye at recoding small differences in light intensity (brightness). Electronic detection requires the use of a microcomputer based laboratory system that includes a sensor an interface and software. We support the use of systems provided by Vernier Software & Hardware or PASCO scientific. You may want to use a pre-configured experiment file for use with the Vernier LabPro software or the PASCO DataStudio software. Since the electronic sensor is first used in Activity 1.3.2, these configuration f iles are available for downloading from the EiP instructor website under the names L010302.mbl (for the Vernier LabPro Software) or L010302.ds (for the PASCO DataStudio Software). The "black body" used in Activity 1.3.4 can be any fairly small cardboard box with a lid on it so light cannot get in or out of it except through a small hole cut in it. A Stationary box just big enough to hold a mini-Maglite (as shown on page B-23) work well. If the inside of the box is actually white when its lid is removed, the fact that the hole always looks black surprises students.
2. From Light to Sight
The overarching purpose of this section is to develop a model for how the eye could act to organize information contained in the light coming from objects. We start with the hypothesis, based on observations in Section 1, that when someone sees an object, light emitted from the object and/or scattered off of it enters the eye. Students go on to build an idealized eye that includes a glass lens. They then study how a lens can act to focus the image of a dim object on a screen that represents the retina of the human eye.
![]() Time Estimate: Allow about 255 min for students to complete the activities in Section 2.
Time Estimate: Allow about 255 min for students to complete the activities in Section 2.
2.1 Modeling the Eye
Students begin this subsection by observing each other pupils and what happens to them in bright and dim light (Activity 2.1.1). As part of this activity they are asked to (1) think of reasons why pupils dilate in dim light and (2) consider a possible relationship between the fact that all pupils are black and the "black body" they observed in the previous section. In Activity 2.1.2 students construct the simplest possible eye-"a pinhole eye." This consists of an illuminated object (in this case a pencil) and a screen to display an image. The object and the screen are mounted on an optical bench on either side of a variable aperture. The pencil is illuminated with light from a bright projector. Students are asked to use the Figure on page B-28 and draw rays of scattered light emanating that could pass through the aperture from opposite ends of various the pencil.
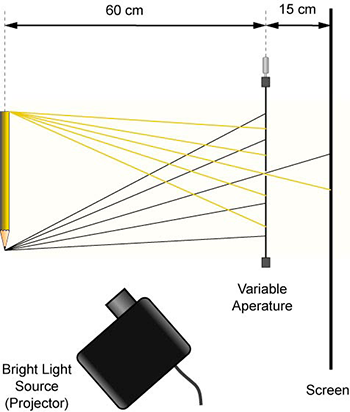
Figure 1: Diagram from page B-28 of the EiP Activity Guide with correctly drawn light rays.
Later in this activity, they perform a very similar task in which the illuminated objects are two different colored circles.
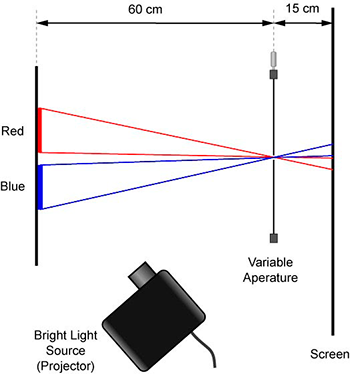
Figure 2: Diagram from page B-29 of the EiP Activity Guide with correctly drawn light rays.
Next they describe the small inverted image that forms on the screen and relate this to the rays they have drawn.
In Activity 2.1.3 students observe that when the light shining on the object becomes dimmer, the image fades out. What to do? Aha, increase the size of the aperture. Before observing what happens when the aperture size is increased, the students are asked to predict what kind of image they will observe based on their drawings of more rays on the diagram on page B-31.
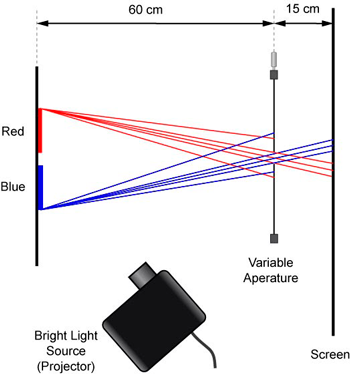
Figure 3: Diagram from page B-31 of the EiP Activity Guide with correctly drawn light rays.
Even after doing drawings, students are often surprised that the bigger aperture yields such a fuzzy image. At the end of this activity there is an important checkpoint.
![]() Stumbling Block: Many students have difficulty doing the drawing on page B-31 of sample light rays through a wider aperture even if they are able to do the earlier pinhole drawing on page B-29. They need to remember that light scatters off an object in many directions, each ray travels in a straight line through air, but only those rays traveling through the aperture will reach the screen. You should circulate among groups as they start Activity 2.1.3, but may not discover this problem for some groups until reaching the checkpoint. In any event it is vital that students get the hang of these types of ray diagrams. Otherwise they may get lost during upcoming activities.
Stumbling Block: Many students have difficulty doing the drawing on page B-31 of sample light rays through a wider aperture even if they are able to do the earlier pinhole drawing on page B-29. They need to remember that light scatters off an object in many directions, each ray travels in a straight line through air, but only those rays traveling through the aperture will reach the screen. You should circulate among groups as they start Activity 2.1.3, but may not discover this problem for some groups until reaching the checkpoint. In any event it is vital that students get the hang of these types of ray diagrams. Otherwise they may get lost during upcoming activities.
Next students consider how a lens might get rid of the fuzzy image. Before considering this activity students are invited to study a cutaway diagram of the human eye. You should draw their attention to the curved cornea and lens in the diagram and consider that "system" as being similar in ways to a glass lens. In Activity 2.1.4 students return to the setup in Activity 2.1.3 (in which a dim light shining on the image and the aperture is wide). Then students observe what happens to the image when a concave lens is placed between the aperture and the screen. When a lens is positioned well the image is amazing. It's clear and bright! At the completion of Section 2.1, students have created a very simple model of the eye out of variable aperture (in the role of pupil), a lens (in the role of the cornea, vitreous humor, and eye lens system), and a screen (playing the role of retina).
2.2 Changing the Direction of Light
The goal of this subsection is to explore simple refraction of light incident on straight surfaces in preparation to study what convex lenses do to light. Students begin this subsection by drawing rays to establish that the lens in their model eye must be bending light rays in order to create a small image on the screen (Activity 2.2.1). Next students observe what happens to a beam of light traveling through air as it enters and leaves a Plexiglas or glass rectangle (Activity 2.2.2). The subsection then ends with the construction of a simplified model of a convex lens consisting of a glass rectangle with a glass triangle at each end. Students can predict that refraction can explain how a "simple" lens can bend light by means of refraction so that light from an image converges to a relatively small spot on a screen (Activity 2.2.3).
![]() Stumbling Block: Many students have trouble with drawing ray diagrams to observe refraction and generalizing about refraction as a function of the angle of incidence. You should start with a review of the facts that: (1) light is observed to travel in a straight line through a uniform transparent substance (i.e. air, water, glass, etc) and (2) the concept of normal to a surface developed in Activity 1.3.1 on reflection. Many students will need help constructing normals and defining angle of incidence and angle of refraction. For this reason there is a very important checkpoint after Activity 2.2.2 on refraction.
Stumbling Block: Many students have trouble with drawing ray diagrams to observe refraction and generalizing about refraction as a function of the angle of incidence. You should start with a review of the facts that: (1) light is observed to travel in a straight line through a uniform transparent substance (i.e. air, water, glass, etc) and (2) the concept of normal to a surface developed in Activity 1.3.1 on reflection. Many students will need help constructing normals and defining angle of incidence and angle of refraction. For this reason there is a very important checkpoint after Activity 2.2.2 on refraction.
2.3 A Lens in Action
The goal of this subsection is for students to observe, first hand, how a real convex lens acts to create an image on a screen. Students begin this subsection by using a ray box that puts out 5 rays of light. Activity 2.3.1 addresses the question: What happens when the rays are incident on the lens along a line parallel to the axis of the lens? By alternating between informal sketches and direct observations, students confirm that the real lens and their simplified lens have very similar behavior and can focus the image of a small pencil at a certain distance from the lens. In the next activity students consider why an image is formed even when part of the lens is covered (Activity 2.3.2). When they finish this activity students should be able to predict that the slit like pupil of a cat's eye and the round pupil of a human eye both act to increase or reduce light coming into the retina without preventing a full image from forming. The section ends with a discussion of the parallels between the model eye and the real eye.
![]() Stumbling Block: Once again many students have trouble with drawing proper ray diagrams. You should circulate among groups and take a look at the sketches.
Stumbling Block: Once again many students have trouble with drawing proper ray diagrams. You should circulate among groups and take a look at the sketches.
3. Color: How Can We See It?
The main purpose of this section is to investigate whether color is a property of light or of an object or both and to observe, as Newton did, that white light is a combination of many colors.
![]() Stumbling Block: We know that some percentage of your male students may be color blind. There are several forms of color blindness and we have not tested how students with various forms of color blindness may disadvantaged by making the observations called for in this section (and the next). It might be useful to obtain a set test charts and try to determine whether colorblindness might affect the ability of students to complete the required activities.
Stumbling Block: We know that some percentage of your male students may be color blind. There are several forms of color blindness and we have not tested how students with various forms of color blindness may disadvantaged by making the observations called for in this section (and the next). It might be useful to obtain a set test charts and try to determine whether colorblindness might affect the ability of students to complete the required activities.
![]() Time Estimate: Allow about 225 min for students to complete the activities in Section 3.
Time Estimate: Allow about 225 min for students to complete the activities in Section 3.
3.1 Color and Light
Students begin this subsection with Activity 3.1.1. In this activity they make predictions of what will happen to a beam of white light from an overhead projector when various colored filters and combinations of colored filters are placed on the projector surface. Their predictions are then tested. The observations require expensive high quality filters, an overhead projector and a screen. For this reason, each prediction is usually tested by the instructor. This first activity leads students to consider the question: What is the color white? In Activities 3.1.2 and 3.1.3 students use a prism and a bright white light source and filters to replicate some of Isaac Newton's classic observations that led him to conclude that white light is a combination of a spectrum of colors.
![]() Stumbling Block: Unless they have worked with theater lighting, most students are not familiar with the action of filters. For example, students who remember mixing paints and may predict that when white light comes through a red and blue filter the result will be purple instead of black. In fact any combination of RGB filters (Red-Green-Blue) or CMY filters (Cyan-Magenta-Yellow) will block all the white light. However, a combination of CMY and RGB filters (such as Blue + Cyan) will let blue light through.
Stumbling Block: Unless they have worked with theater lighting, most students are not familiar with the action of filters. For example, students who remember mixing paints and may predict that when white light comes through a red and blue filter the result will be purple instead of black. In fact any combination of RGB filters (Red-Green-Blue) or CMY filters (Cyan-Magenta-Yellow) will block all the white light. However, a combination of CMY and RGB filters (such as Blue + Cyan) will let blue light through.
![]() Technical Tip: (1) We get spectacular results demonstrating with a set of high quality dichroic glass filters from Edmund Scientific [50 mm additive Red, Green, Blue filters (F52547) and 50 mm subtractive Cyan, Magenta, and Yellow filters (F52550)] . Handle them with care, we have broken a few! These are expensive at about $25 each but worth it. (2) It helps to mask the white light portions of the overhead projector's light so the combinations do not cause whatever light does come through the filters to be washed out.
Technical Tip: (1) We get spectacular results demonstrating with a set of high quality dichroic glass filters from Edmund Scientific [50 mm additive Red, Green, Blue filters (F52547) and 50 mm subtractive Cyan, Magenta, and Yellow filters (F52550)] . Handle them with care, we have broken a few! These are expensive at about $25 each but worth it. (2) It helps to mask the white light portions of the overhead projector's light so the combinations do not cause whatever light does come through the filters to be washed out.
3.2 Transmission Graphs and the Spectrum of Light
Students begin this subsection by using a diffraction grating spectrometer to observe the spectrum of white light as well as white light after it has passed through blue, red, and green filters (Activity 3.2.1). The next activity (Activity 3.2.2) is optional. Here students look at the spectral foot print of one or two gas light sources that contain elements such as hydrogen, helium, mercury, neon, etc. They can also have a look at the Sun if its out.
![]() Technical Tip: A convenient, relatively inexpensive transmission grating spectrometer has been developed by Project Star and can be purchased from scientific suppliers. Although cheap filters can be distributed to the students for their observations, you may want to follow up with a demonstration using the dichroic filters.
Technical Tip: A convenient, relatively inexpensive transmission grating spectrometer has been developed by Project Star and can be purchased from scientific suppliers. Although cheap filters can be distributed to the students for their observations, you may want to follow up with a demonstration using the dichroic filters.
3.3 Real Objects
The main purpose of this subsection is to establish that what we see in the way of color when a "real" object is illuminated is determined by both the spectral characteristics of the light that illuminate the object and the parts of the spectrum that are absorbed and scattered from the object.
Students begin this subsection with Activity 3.3.1. This activity is a thought experiment in which students are asked to predict what happens when looking through a green filter at white light scattering off a white object. They are then ask what will happens to the white light illuminating a green object. What portion of the light's spectrum would be absorbed? Scattered? What would someone see if blue light illuminates a green object?
In Activity 3.3.2 students are asked to predict what will happen if they shine light on a red object and a white object in an otherwise dark room. Next they can test their predictions. Activity 3.3.3 is an extension of the previous activity. Students can consolidate their understanding by considering and then observing what happens when light passing through a blue filter is incident on a red object. They should predict and see an essentially black object. Since the paper and filtered light are not perfectly narrow the object observed in Activity 3.3.3c will probably have a dull brownish cast - hopefully convincing enough. These first three activities end with a checkpoint and a summary discussion of how the filtering of light and the scattering of light from an object involve color subtraction. This is because in both processes some of the light in the spectrum of the light incident on the filter or object are absorbed or removed from the bream of light.
In Activity 3.3.4 students consider the phenomenon of color addition using light beams that have passed through red, green and blue filters. Color addition occurs when two or more of these beams of light overlap to create a third color. After these RGB demonstrations are completed, you might want to show students what happens when Cyan, Magenta, and Yellow filtered light are added to each other.
![]() Technical Tip: (1) The observation in Activity 3.3.2 is a good place for an all class demonstration since it is important that the spectral characteristics of the light coming through the red filter and that of the scattered light coming from the red paper be closely matched. (2) The dichroic red filter and a square of red origami paper work quite well. Sorry, but we forgot to list the origami paper in the list on page B-47. (3) Activity 3.3.4 on color addition requires the good filters and should be presented as an all class demonstration. If you use a bright white light source from an overhead projector, good filters and a very reflective screen this demo can be stunning. It is much more dramatic if you prevent stray white light from hitting the screen.
Technical Tip: (1) The observation in Activity 3.3.2 is a good place for an all class demonstration since it is important that the spectral characteristics of the light coming through the red filter and that of the scattered light coming from the red paper be closely matched. (2) The dichroic red filter and a square of red origami paper work quite well. Sorry, but we forgot to list the origami paper in the list on page B-47. (3) Activity 3.3.4 on color addition requires the good filters and should be presented as an all class demonstration. If you use a bright white light source from an overhead projector, good filters and a very reflective screen this demo can be stunning. It is much more dramatic if you prevent stray white light from hitting the screen.
4. The Real World: Rainbows, Blue Skies, and Sunsets
In this culminating section students consider the questions: What makes a rainbow? Why is the sky blue? And why are Sunsets red?
![]() Time Estimate: Allow about 165 min for students to complete the activities in Section 4
Time Estimate: Allow about 165 min for students to complete the activities in Section 4
4.1 Rainbows
This subsection begins by asking students to consider what conditions are needed in order for a rainbow to form (Activity 4.1.1) Hopefully various student groups will come up with the idea (based on their previous experiences with rainbows) that both rain and Sun are needed. In Activity 4.1.2 students make a model of rainbow using a petri dish full of water (representing a rain drop) and a beam of incandescent light (representing a Sunbeam). After figuring out how internal reflections act to bring the light from the "Sun" into a raindrop and back, students can try to predict where they have to stand relative to the Sun and the rain to see a rainbow.
![]() Technical Tip: Seeing the rainbow emerging from the petri dish "raindrop" is tricky unless the room is fairly dark and the angle of incidence of the ray of "Sunshine" is set very carefully. This takes some fiddling.
Technical Tip: Seeing the rainbow emerging from the petri dish "raindrop" is tricky unless the room is fairly dark and the angle of incidence of the ray of "Sunshine" is set very carefully. This takes some fiddling.
4.2 The Sun and the Sky
This subsection consists of three activities. They are aimed at helping students deduce that if air molecules act to scatter the blue light component out of a white light beam coming from the Sun that: (1) the Sun will appear yellow to someone looking directly at it and the sky will appear blue to someone looking away from the Sun as the blue light component of Sunbeams will be scattered in all directions by air molecules; and (2) Sunsets are red because the Sunlight passes through more atmosphere, more blue light is scattered out leaving the Sun looking red.
Activities 4.2.1 & 4.2.2 involve pure thinking and discussion. Students are asked to consider whether they can see air and how the sky can be blue if it is made up of invisible air. How come the sky is not blue at night? What direction is light coming from when you look at the Sun? When you look at the blue sky away from the Sun? Then in the final activity (4.2.3) students use a colorimeter attached to an MBL system to measure the transmission of various colors of light through water with creamer particles in it that act to scatter light. The results of these observations allow students to deduce that if air molecules scatter light in the same way that creamer particles do, then the sky should be blue and sunsets should be red.
At this point we recommend that the instructor fill a large fish tank with water, shine a projector light beam through the tank and invite the students to look at both scattered light and the projector beam emerging from the other end of the tank. As creamer particles are added to the water, the students can see that more and more bluish light is scattered out of the sides of the tank. The can also see the projector light coming out the end of the tank go from white to yellow to orange to red as more and more creamer is added to the water.
![]() Technical Tip: An MBL experiment file named B040203(ColorTransmission) has been created to help your students measure the percent transmission using a colorimeter. Since the light output for different colors varies, your students will need to calibrate the colorimeter each time a transmittance is measured. You should familiarize yourself with this process using the instructions provided by the vendor who supplied your colorimeter.
Technical Tip: An MBL experiment file named B040203(ColorTransmission) has been created to help your students measure the percent transmission using a colorimeter. Since the light output for different colors varies, your students will need to calibrate the colorimeter each time a transmittance is measured. You should familiarize yourself with this process using the instructions provided by the vendor who supplied your colorimeter.
![]() Technical Tip: When putting creamer grains into a cuvette of water, it is essential that the mixture isn't too dark or too light. Try this out before class. The mixture should look clouded, but when you hold it up to a light source, you should be able to see a fairly clear image of the light.
Technical Tip: When putting creamer grains into a cuvette of water, it is essential that the mixture isn't too dark or too light. Try this out before class. The mixture should look clouded, but when you hold it up to a light source, you should be able to see a fairly clear image of the light.
5. Project Ideas
We recommend that students engage in projects as a capstone experience to help them learn more about Light, Sight, and Rainbows. If you can assemble the needed equipment and supplies each student groups of 2-4 (3 seems to be the optimal number) can either do one of the recommended projects or design one of their own with your help. Check out the Projects sections for more information on how we structure the projects portion of our courses and to find some examples of projects.
![]() Time Estimate: Allow about 15 or more hours for students to complete and report on projects.
Time Estimate: Allow about 15 or more hours for students to complete and report on projects.
Icon Legend
![]() Student Stumbling Blocks: The text following this icon describes some of the stumbling blocks that you might encounter while teaching this section. If you encounter other significant stumbling blocks, please e-mail David Jackson.
Student Stumbling Blocks: The text following this icon describes some of the stumbling blocks that you might encounter while teaching this section. If you encounter other significant stumbling blocks, please e-mail David Jackson.
![]() Technical/Equipment Tips: The text following this icon describes some technical tip(s) that might be helpful when setting or executing the activities in this section. Often these tips describe the construction or setup of equipment or indicate instances where students might have difficulty with the equipment.
Technical/Equipment Tips: The text following this icon describes some technical tip(s) that might be helpful when setting or executing the activities in this section. Often these tips describe the construction or setup of equipment or indicate instances where students might have difficulty with the equipment.
![]() Time Estimates: The text following this icon gives a rough estimate of the amount of time the activities in this section will require.
Time Estimates: The text following this icon gives a rough estimate of the amount of time the activities in this section will require.