1
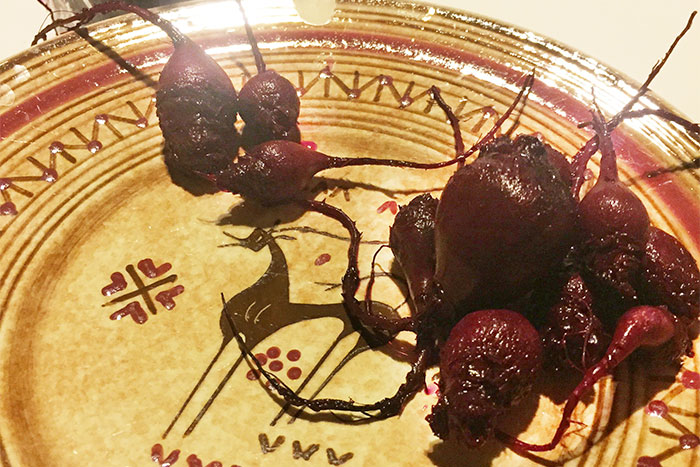
Fill a wide-mouth jar or ceramic crock with baby beets or large beets cut into 1” cubes. Trim the leaf and root ends and scrub the beets well, but don’t peel!
by David Durstewitz ’10
Did you know that 40 to 50 percent of food grown goes to waste, mostly due to aesthetic imperfections and inefficiencies in global distribution?
Lactofermentation is the 8,000-year-old process of preserving food by culturing bacteria and their yeast friends in all kinds of foods to produce lactic acid, which inhibits putrefying bacteria and aids in digestion. It is an essential part of food cultures worldwide, from cassava in West Africa to fish sauce in East Asia and sauerkraut in Europe. Live ferments are more nutritious than heat- and pressure-treated preserves and enable us to store local food year-round.
It is a living process and often does not yield the consistency demanded by industrialization, which has led to a flattening of culture and a dangerous disconnect from our food systems. As we continue to wreak havoc on our backyards and especially the backyards of the poor and marginalized, it is becoming more and more crucial to reestablish local food systems and the place of lactofermentation within them.
1 Fill a wide-mouth jar or ceramic crock with baby beets or large beets cut into 1” cubes. Trim the leaf and root ends and scrub the beets well, but don’t peel! 2 Cover the beets with filtered water, then pour the water out. Make brine by mixing pure salt (sea or other mineral salt is fine—no iodine, no anti-caking agents!) with the water and bring to a boil. Use 2 to 3 tbsp. salt per quart of water, or “as salty as the sea”—I do it to taste. The saltier the water, the crisper the veggies will be, the less attention you have to give and the longer they’ll last. But I like to keep them palatable without needing a rinse.
3 While the water is cooling, season your beets. I like garlic, onion, bay leaf, peppercorns and celery seed, but you can add dill seed, hot pepper, the classic Southern clove/cinnamon/allspice/anise or whatever you like. I prefer seeds for seasoning; delicate leaves like fresh dill tend to get soft and slimy. 4 Clean the jar and weight well—sterilize in a dishwasher or in the oven, or a lazy sterilization (rinse the jar with boiling water) has always worked for me. It doesn’t need to be as sterile as in canning, since the lactobacteria will be active and you’ll be able to monitor the ferment. 5 Pour room-temperature brine over the beets and weigh them down to keep them below the surface of the water. My preferred weight is a jar full of water that’s just smaller than the jar of the fermentation vessel. I add a splash of raw cider vinegar to ensure that a good culture is present—maybe more ritual than utilitarian.
6 Cover the opening with cloth and rubber bands to keep flies out but allow the ferment to breathe. Place it somewhere you can watch it, out of sunlight and at a stable room temperature. You’ll see it start to bubble, and if it’s overfull it may bubble over.
7 Once it’s settled down, leave them alone for a week to two months. I consider them done when a fork can be stuck in with some resistance, usually three weeks to a month, but it’s a personal preference of taste and texture. 8 When satisfied, seal the jar and put it in the fridge. It will continue to ferment but much more slowly.
9 If a thin, white film begins to form, stir it and make sure all solids are kept submerged. This is called fleur de vin and is harmless, but a strong, healthy ferment should keep it from forming, and it can affect the flavor if left too long. Stirring and adding more salt and a little raw vinegar will help. If it doesn’t stop forming, I’ll cook the ferment and eat it before the fleur de vin can take over; you might choose to compost it and start over with more salt next time.
Your ferment should smell good, have some firmness and be free of mold, even after years!
Tips & Tricks: The same procedure works for carrots, turnips and others. I tend to leave firmer vegetables like beets and celeriac out of the fridge and eat them as they soften, but I like to keep cucumbers and carrots in the fridge once they’re to my liking. I prefer to eat ferments raw for the probiotics, but by early spring I often make fermented borscht if I haven’t run out of the ingredients—pickled beets, jalapenos, sauerkraut, dried farm tomatoes and storage crops from our pantry (potatoes, carrots, onions, garlic). I use whey strained from yogurt as a cooking liquid, and I mix in a healthy dose of yogurt to make it cool and creamy.
1 Heat milk (full fat is best) to at least 160 degrees for 15 seconds, stirring every few minutes. Stir to keep it from boiling or sticking to the bottom of the pot, up to 200 degrees. Higher heat yields thicker yogurt. 2 Cool milk to 115 degrees. Add plain, unsweetened yogurt at room temperature, ½ cup per gallon, and whisk. 3 Incubate as close to 115 degrees as possible, no higher, for 6-10 hours. The longer the incubation, the thicker and more sour the yogurt will be. 4 Move the yogurt to the fridge. For Greek yogurt, strain through a cheesecloth-lined colander for a few hours—use the whey for cooking!
Tips & Tricks: I use a one-gallon jar, faux-sterilized with the hot milk, and cool it in warm tap water inside a stock pot until the water and milk are both 115 decrees on my candy thermometer; then I wrap the whole thing in blankets and leave it on my radiator overnight. At the Music House I followed a simpler rubric: 170 degrees is just starting to bubble, 115 degrees is when you can put your finger in for five seconds and it just starts to hurt. I then left the milk in a cooler of warm water.
It all started at the Treehouse one spring morning, with a jar of milk sitting in a window, soaking in sunlight. Kalyn Campbell ’10 decided to teach David Durstewitz ’10 how to make yogurt, thus introducing him to a world in which her goal of only eating food grown within 30 miles stopped seeming ridiculous and became much more real. Campbell spent several years running a creamery in rural Vermont and is now homesteading, and Durstewitz is a vegetable farmer in Chicago. He still makes yogurt the way he learned that spring, though now with a nearby farm’s non-homogenized grass-fed milk rather than bulk-ordered from the caf.
Read more from the fall 2018 issue of Dickinson Magazine.
Published October 22, 2018